
Imagine sitting on the back looking up towards the sky at night. You suddenly notice a stunning galaxy and stars that will blow your mind. This is it: the Milky Way, and – by using a few simple tips and tricks, you can create amazing images that will leave your family and viewers stunned.
This article will teach you ways to organize and implement the perfect Milky Way photography session. From finding the ideal spot to using the most effective equipment and techniques I’ve got it covered. Learn the best ways to record every aspect of that celestial chandelier that is glinting overhead, and produce images that are truly extraordinary.
So, what are you waiting to do? Let’s uncover all the mysteries of Milky Way photography, and extend your abilities to the limit and beyond. Once you begin taking these stunning images that you’ll never be able to stop. Let’s go!
1. Make your photographic plans around the galactic central
If you’re planning to take stunning pictures from The Milky Way, then you’ll have to plan your shots in the area of galactic central. This is the most bright and most stunning area of our galaxy, but it’s only visible in certain times and places. (I prefer to call the galactic core in the form of “The The Big C.”)
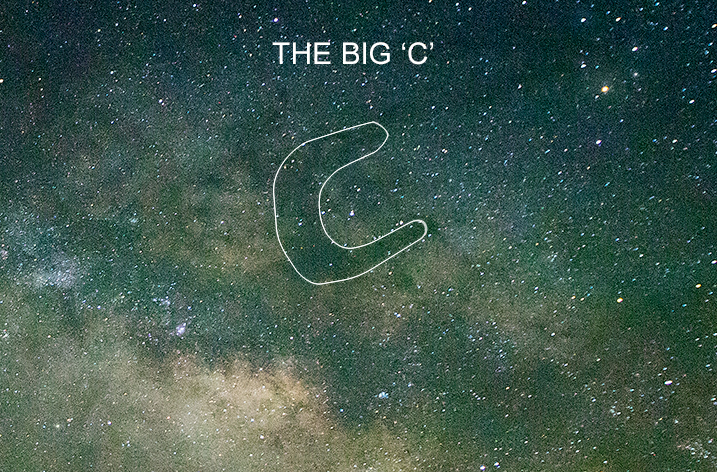
For photographers who are in northern Northern Hemisphere, the galactic core is visible between late April and the end of July. It is observed in the southeastern and southwest sky. As summer progresses it shifts westward and at close to the summer’s conclusion it will rise in the southwestern sky. However, you won’t be visible in winter.
Photographers who are in southern Southern Hemisphere have it a little bit more easily, as the central region appears visible between February through October, with the best visibility in July and June.
Be sure to consider the lunar phase when planning your photography. To get the most clear Milky Way pictures you should avoid an overly bright moon. However, a full moon can yield amazing images (as long as it’s not located in between the Milky Way, where it is excessively bright).
For help planning your shoots, there’s a wealth of apps for desktops and phones that are available. My favorite app is Stellarium that is available for free on your desktop. Simply enter your location along with the desired date, and it will provide you with the date and time the galactic core is in the lunar phases. It’s a fantastic method to make sure you’re at the right spot at the perfect time for the perfect Milky Way photographs.
2. Locate a dark spot
For capturing your photos of the Milky Way in all its splendor, you’ll have to locate a spot that is free of light pollution. Some photographers insist on going to dark, remote regions, but don’t worry when you aren’t able to travel to one of these. It is possible to capture amazing photos even in areas with certain light pollution.
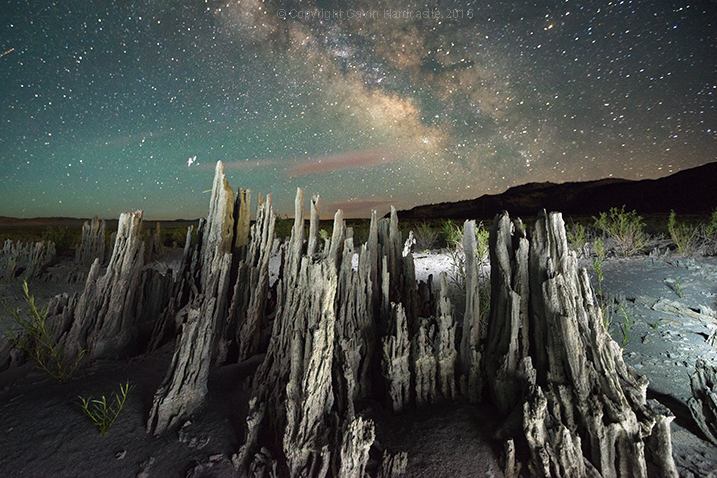
In reality, a hint of distant light could provide a unique look to your photos, such as in the photo below, which I took at Death Valley. The light on the horizon creates a stunning contrast between the sky and the earth:
If you can observe the Milky Way with your naked eye, then you can take a picture of it! But, if you’re trying to learn about the top dark sky sites, International Dark Sky Places is an excellent source.
3. Make sure you are waiting for clear weather
If you’re a photographer who shoots landscapes and you love an impressive sky that is filled with fascinating clouds. However, when it comes down to photographing the beauty of Milky Way, clear skies are what you’re seeking. Because even a tiny cloud can block starlight and spoil the shot.
But that does not mean that you must stay clear of shooting on a cloudy night. In fact, clouds with a few wisps can give an additional dimension of drama and frame the Milky Way photo, creating an original and memorable outcome.

Don’t let just a shade of cloudiness stop you from stepping out to photograph images of Milky Way. If you use the right approach and a little imagination you can transform an overcast night into a memorable and beautiful photography chance.
4. Include elements for the ground
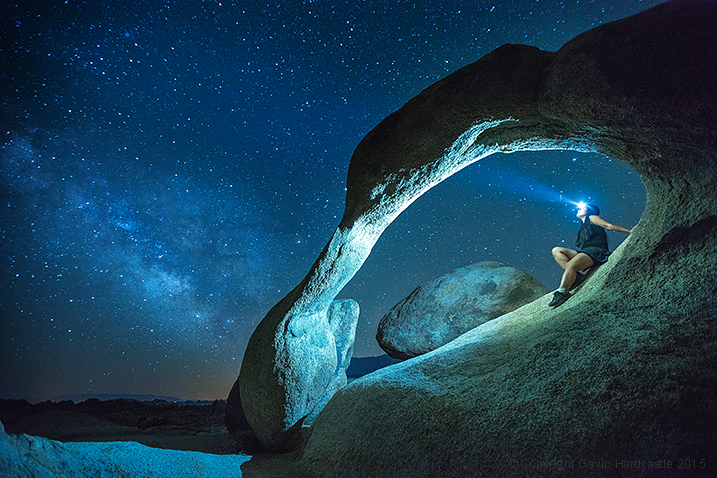
The most spectacular Milky Way images are the ones that showcase the galactic center in relation to Earthly objects. A seemingly ordinary sitting in chairs can be extraordinary when framed by marvels that are the Milky Way.
Consider carefully what you’d like in the background part of the Milky Way shot. Even if you master the perfect lighting and conditions however, your image can look boring if you do not add anything else to the frame to give the viewer background. Pick a captivating foreground feature or perhaps try some painterly techniques to create Milky Way photographs truly breathtaking.
This could range including a distinctive rock formation such as a sea stack or arch, or a shed that is in disrepair or a fascinating tree. Look for locations with an interesting feature, and then determine the way that this location is aligned to that of the Milky Way.
5. Make sure you use the correct lens
Although using the equipment you already have is practical, nighttime photography can be difficult due to the absence of lighting. For amazing Milky Way shots, you’ll require a lens that is fast and has an aperture f/2.8 or higher.
Ultra-wide angle lenses are great for capturing scenes at night since they generally cause only a tiny amount of blur. Even at an max aperture of f/1.4 An ultra-wide lens can retain a significant portion of your photograph within focus (assuming you are focused properly!). The final thing you want is an incredibly clear, sharply-focused Milky Way with a foreground that appears as soft and soft blurred bokeh. This is why you should leave the beautiful 85mm f/1.4 at the house.
Another benefit of super-wide lenses is that you are able to squeeze a good portion parts of Milky Way into your frame as well as having less magnification which allows for higher times before your stars that are in the image start to follow.
Do not fret if you have a basic all-purpose kit lens that’s not very fast. It is possible to still capture excellent Milky Way shots by using long exposures and high ISO settings to increase your camera’s ability to detect light.
If you’re just starting to get into this genre you’ll be happy to be aware that some of the most sought-after wide-angle lenses used for night photography are reasonably priced. Rokinon (also also known as Samyang) has two primes that’ve earned an enviable reputation among photographers who shoot night such as The 14mm f/2.8 and 24mm f/1.4 lenses. The build quality may not be the best but if you take care with them they generally perform well.
These lenses are popular due to the fact that they provide sharpness, speed as well as a large area of vision, and less coma than more expensive lenses. (Coma is an elliptical aberration that occurs in the vicinity of stars.) Certain lenses that are more expensive cause a coma that is extremely bad on stars that are in the corners of the frame. This isn’t the end all universe, yet it’s certainly not the best.
6. Select the best camera
When it is about Milky Way photos, using the correct camera is crucial. You’ll require a camera which can manage the highest ISO settings for long exposures while producing high-quality images. Even if your camera’s not top-of-the-line, it could be surprised by the top-quality of the high ISO images due to the latest advances with camera technology.
Some of the top cameras to shoot astrophotography in the last few years include full-frame models such as that of the Canon EOS R5 and or the Nikon Z7 II as well as the Sony A7 IV. Don’t be concerned when you shoot with four Thirds or APS-C sensor, you can still achieve great outcomes using the correct methods.
Don’t forget, you don’t need the latest and most expensive equipment to begin. Make the most of what you have and then upgrade when you are able to resist the urge to spend more.
A key feature on your digital camera will be a great Live View screen, also known as an the electronic viewfinder (EVF) to assist you compose and focus your photos.